Capture from Xcode Simulator or Device Hub
Quick answer: ButterKit’s Capture Tool captures screenshots directly from Xcode Simulator (Xcode 26 and earlier) or Device Hub (Xcode 27 and later) and drops them into 3D device frames in your ButterKit document. Open ButterKit and your simulator, grant the Capture permissions once in ButterKit > Settings > Capture, then press Capture. Device Hub support requires ButterKit v2.2.20 or later.
Instead of manually capturing and managing screenshot images, ButterKit supports capturing your screenshots directly from Xcode Simulator or Device Hub via the built-in Capture Tool. Of course, if you already have a folder of images you’ve captured, or use an automation like Fastlane, you can also link the folder if you wish.
What do I need before I start?
- Make sure you’re running the latest version of ButterKit (to check for updates, select ButterKit > Check for Updates). Device Hub support requires ButterKit v2.2.20 or later.
- Open ButterKit and a running simulator: the Simulator app on Xcode 26 and earlier, or Device Hub on Xcode 27 and later. Device Hub opens automatically when you run your app on a simulator from Xcode.
Prefer the 2 minute video tutorial?
How do I capture screenshots from Xcode Simulator or Device Hub?
Step 1: Set up
Go to ButterKit > Settings > Capture and ensure the capture tool is set up with the proper permissions. These permissions are required so ButterKit can interact with Xcode Simulator or Device Hub and capture screenshots directly.
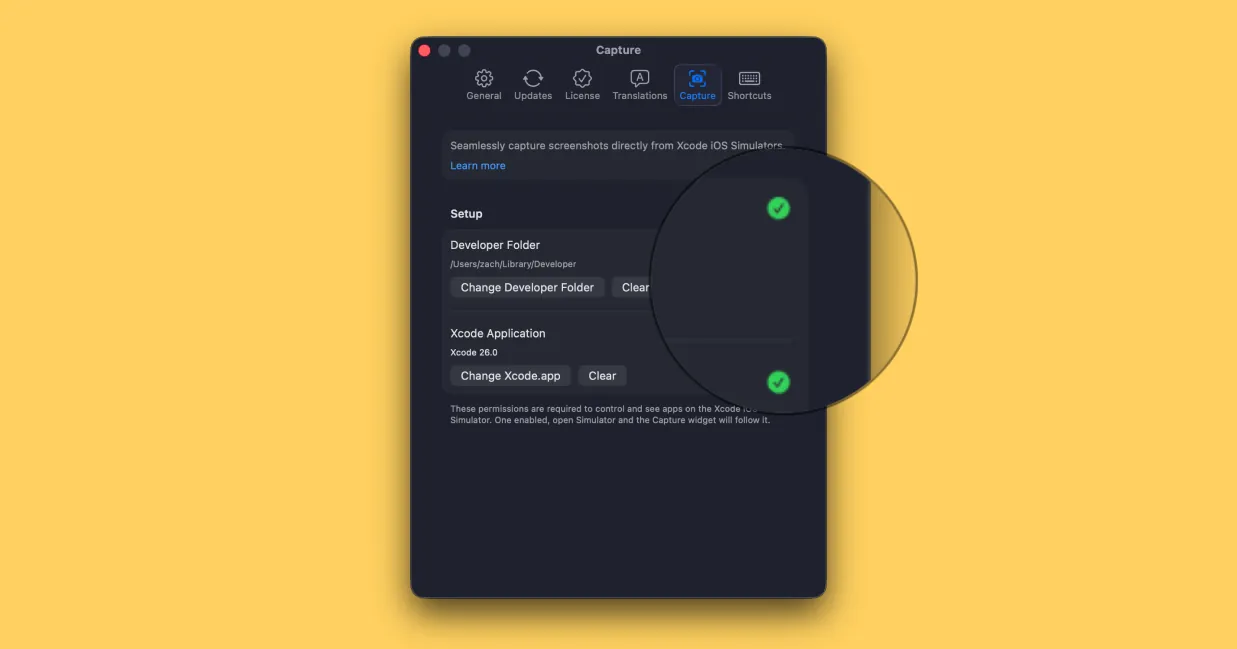
Ensure the Capture tool is properly set up
Step 2: Use the ButterKit Capture Tool with Simulator or Device Hub
With ButterKit open and a simulator running, the Capture Tool appears and follows the active window: the Simulator window on Xcode 26 and earlier, or the Device Hub window on Xcode 27. Simply press “Capture” to import that screenshot into ButterKit. Tip: if you’re not seeing the ButterKit Capture Tool, ensure the tool has proper permissions (Step 1). You may need to restart ButterKit for the new permissions to take effect.
Tip
For even faster captures, focus/click on the Capture tool, then use your keyboard arrowkeys to navigate to the selected artboard.
Step 3: Swap localizations in one click
ButterKit makes it easy to change Xcode localizations for your app and capture it in seconds. Simply press “Available Localizations” in the ButterKit Capture tool and select one.
These localizations are automatically pulled from your string catalog in your Xcode project, so if you don’t see any, you’ll need to add more localizations to your string catalog or migrate from the legacy .strings format to the new Strings Catalog pattern.
What happens after I press Capture?
ButterKit does the heavy lifting for you, capturing directly from Xcode Simulator or Device Hub, importing and optimizing the screenshot, framing it into a realistic 3D device, and formatting your artboard ready for export to the App Store. Share your screenshots and app launch on the ButterKit Discord or subreddit for feedback and support from fellow builders/designers/devs.
How does the Capture Tool work with Xcode Device Hub?
In Xcode 27, Apple moved simulators into Device Hub, a single window that manages simulated and physical devices and takes the place of the standalone Simulator app. ButterKit v2.2.20 and later support Device Hub with no extra setup:
- Both window modes work. The Capture Tool attaches to Device Hub’s compact window (the default when you run your app from Xcode) and to the expanded window with the sidebar, canvas, and inspector.
- It captures the device shown in the canvas. If you have several simulators booted, select the one you want in the Device Hub sidebar before pressing Capture.
- It hides when Device Hub isn’t focused, just as it did with Simulator. Click the Device Hub window to bring it back.
- Localizations still come from your Xcode project. The “Available Localizations” menu reads your string catalog, so swapping languages works the same way in Device Hub.
Xcode 27 requires macOS 26.6 or later, so Device Hub works on both macOS 26 and macOS 27.
Not seeing the Capture Tool?
Please note that the Capture Tool automatically hides when Simulator or Device Hub isn’t active/focused. If you have a focused Simulator or Device Hub window and you’re still not seeing it, try these steps.
1. Ensure the correct Developer folder is selected in Settings > Capture Tool
Some users have run into issues (e.g. missing localizations or the tool not appearing) if the incorrect folder is selected. Generally, it looks like this:
/Users/yourname/Library/Developer2. Ensure the correct version of Xcode is selected in Settings > Capture Tool
If an old/beta version of Xcode is selected, the mismatch can break the Capture Tool. This is the most common cause on Xcode 27: if you installed Xcode 27 alongside Xcode 26, make sure the version you’re actually running is the one selected.
3. On Xcode 27, make sure the device is showing in Device Hub
The Capture Tool follows the device that Device Hub is displaying. In the expanded window, select your simulator in the sidebar so its screen appears in the canvas. If a simulator is missing from the sidebar, quit and reopen Device Hub. Device Hub support requires ButterKit v2.2.20 or later, so check ButterKit > Check for Updates if you’re on an older build.
4. Check Xcode Config in Terminal
In some situations, the ButterKit Capture Tool may get confused if there are multiple versions of Xcode installed (or were recently). To quickly troubleshoot, open up Terminal. We can make sure Xcode is configured properly by running these commands:
xcode-select -p
xcodebuild -version
which xcrun && xcrun --version
What these commands check:
xcode-select -p: Prints the path to the active Xcode developer directory that macOS is currently using. This should point to your primary Xcode installation (e.g.,/Applications/Xcode.app/Contents/Developer). If this points to an old or beta version of Xcode, you’ll need to switch it usingsudo xcode-select --switch /path/to/Xcode.app.xcodebuild -version: Verifies that the Xcode command-line tools are accessible and displays the version. This confirms the build system can be invoked correctly. If this command fails or shows an unexpected version, it indicates a configuration mismatch.which xcrun && xcrun --version: First locates thexcrunutility (should be at/usr/bin/xcrun), then verifies it can execute.xcrunis Apple’s command-line tool proxy that locates and invokes developer tools. Ifxcrunisn’t found or fails, ButterKit won’t be able to detect or control simulator instances.
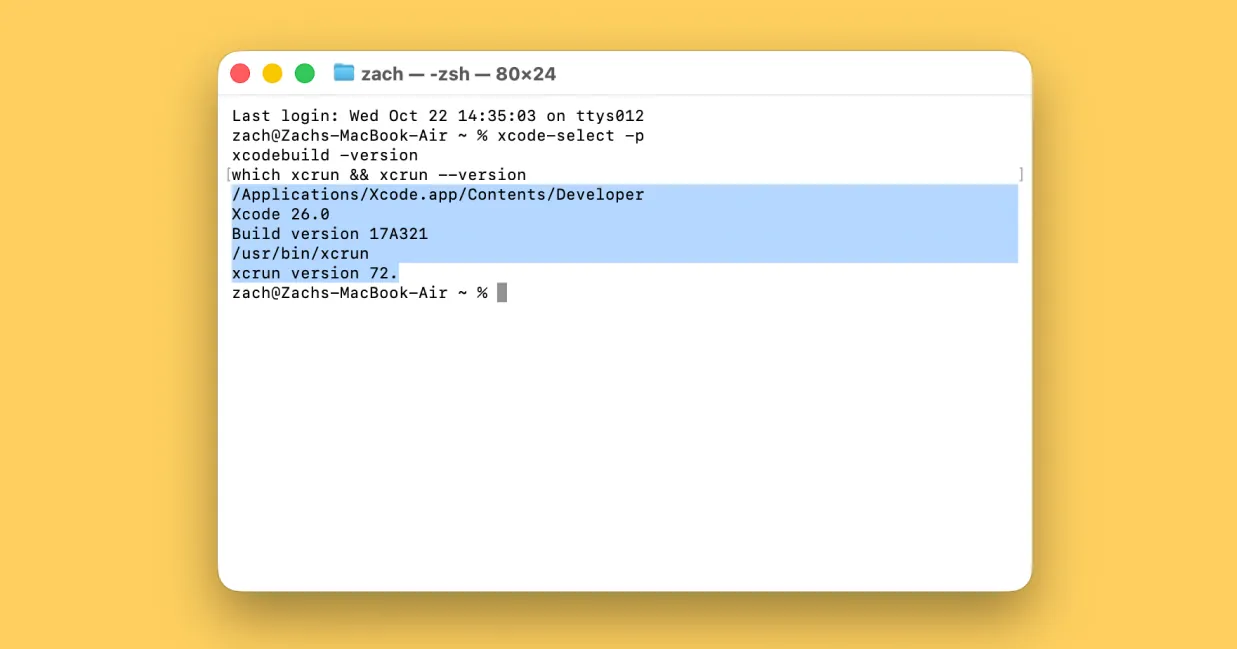
You should see something like the above returned in Terminal. All three commands should execute successfully and point to your desired Xcode installation. If they fail or show inconsistent paths, you may have multiple versions of Xcode installed causing a conflict. Consider uninstalling any unused versions.
5. Double check the Xcode license / terms have been accepted
Open terminal and run:
sudo xcodebuild -licenseAfter running the Terminal commands, restart Xcode and ButterKit. If you’ve completed the above and are still having issues, please reach out to [email protected] and include screenshots and any details you can.
Frequently asked questions
Does the ButterKit Capture Tool work with Xcode 27 Device Hub?
Yes. ButterKit v2.2.20 and later support Device Hub, which hosts simulators in Xcode 27. The Capture Tool appears next to the compact or expanded Device Hub window, captures the device shown in the canvas, and hides when Device Hub loses focus, exactly as it did with the Simulator app.
Do I still need the Simulator app?
Not on Xcode 27. Simulators run inside Device Hub, so the Capture Tool attaches to Device Hub instead. On Xcode 26 and earlier, the Simulator app is still the window the Capture Tool follows.
Can I capture from a physical iPhone shown in Device Hub?
The Capture Tool is built for simulated devices. For a physical device connected through Device Hub, click Device Hub’s own Screenshot button below the device, which saves a full-resolution image to your Desktop, then drag that image onto a 3D device in ButterKit.
Where are images stored when captured with the Capture Tool?
Images will be bundled with the .butterkit file. You can find them by right clicking on your saved .butterkit file > Show Package Contents > assets folder. If images are missing, make sure your project was saved recently.
Quick Help
- Need more help? Browse the Documentation
- Check out our Templates & Add-ons
- Join us on Discord for quick help
- Any other questions? Get in touch